Good news, everyone!
I've finally broken my silence with an announcement. For the past few months I've been working the hours away to produce a tutorial for the Gnomon Workshop and the first volume is finally here!
The tutorial is titled "Subtle Performance Workflow"; the first volume covers shot planning and body animation and the second volume will cover facial anatomy and animation. My whole objective for this tutorial was to outline my workflow and thoughts for animating a realistic, subtle dialogue piece; to get into the nitty gritty of making a character feel vibrant and alive while not doing a whole lot.
Enjoy the final animation! Volume 1 is already out and volume 2 should be up in the next few weeks.
And to coincide with the release of my tutorial, I've put together a reel of the work I personally did on Aladdin. I was a lead on this show and worked closely with modeling and rigging to develop the facial setup used on Genie. I'm pretty proud of how it all turned out. My only regret is that I didn't get to actually meet Will Smith during the time we were making him blue.
Monday, July 13, 2020
Wednesday, January 30, 2019
The Current Situation
2018 didn't go without a fight. The day of my last post, I slipped on the stairs in my home while carrying my two year old son and shattered my ankle. I've been pretty limited in what I've been able to do physically and it takes its toll, mentally. Then my family came to visit for Christmas, and on Christmas Day my father had to be taken to hospital and in those next two days we were told every variation of prepare for the worst. My family and I came home that day and we prayed hard. The next day we were told they had discovered what was killing him; a strain of invasive bacteria. An answer to prayer and day by day he's gotten better and stronger, and now they're back in the States, back to their home so he can recover further in his own bed. Since then my leg has been getting better; I've been able to put more weight on it so I can be a bit more self-sufficient. This week I made a cup of tea for myself!
Though I wish I had posted something for the last two months of the year, the break has allowed me to take a step back and look at it all. I want to dig a little deeper this year and tackle harder topics. Maybe even throw in a video or two. Do something with my Patreon beyond letting it sit there, come up with some exclusive content. Keep an eye on this space!
In the meantime, for January and this new year, please enjoy my latest two showreels representing my work on Star Wars : The Last Jedi and Jurassic World : Fallen Kingdom. I was a lead animator on both of these shows (and specifically the lead animator for Snoke) and I couldn't be more proud of how they turned out and of the work that the entire team at ILM pulled off. It was a dream come true to work on these franchises, and while they were never easy, there's definitely a certain magic to working on something from my childhood, to work on the projects that got me interested in the field of visual effects in the first place. Enjoy!
And as always, keep on keyframing!
Though I wish I had posted something for the last two months of the year, the break has allowed me to take a step back and look at it all. I want to dig a little deeper this year and tackle harder topics. Maybe even throw in a video or two. Do something with my Patreon beyond letting it sit there, come up with some exclusive content. Keep an eye on this space!
In the meantime, for January and this new year, please enjoy my latest two showreels representing my work on Star Wars : The Last Jedi and Jurassic World : Fallen Kingdom. I was a lead animator on both of these shows (and specifically the lead animator for Snoke) and I couldn't be more proud of how they turned out and of the work that the entire team at ILM pulled off. It was a dream come true to work on these franchises, and while they were never easy, there's definitely a certain magic to working on something from my childhood, to work on the projects that got me interested in the field of visual effects in the first place. Enjoy!
Wednesday, October 31, 2018
Just Add Noise
It is relatively easy for an experienced animator to track every arc and create smooth, crisp and clean motion. For a more stylised film, this is fine. Just as the designs themselves are caricatures of reality, so too is the movement. This becomes problematic when thinking in terms of visual effects or realistic animation. In reality arcs are not squeaky clean; there is noise and breakup. The difficulty is in getting noise that feels natural and not like a mistake.
There are a few types of noise; vibration, general noise, and breakup. Vibration is a quickly oscillating noise; you can use this to show tension usually. General noise is usually just random noise, a bit of added dirt to the base animation. And then there's breakup, which can tie in to general noise but it's usually a more deliberate addition. It is the breaking up of a smooth move into multiple parts; for example, slowing or stopping in the middle of a head turn so it doesn't feel quite so perfect.


General noise

Vibration Noise

Break up (on a kind of head shake or something)
Before adding in any noise, I make sure my arcs are clean. It's good to have this as a base as you then know that any noise added is a deliberate choice and not a computer generated artifact or mistake. Usually I'll keep my noise on a layer in case it needs to be toned down or amplified. It makes it easier to edit and gives you more control over its influence. Breakup is the exception; I tend to put this into the base animation as this allows you greater control over the curves.
Layers also allow you to animate the weight of the noise. Let's say you have someone lifting a heavy object, and you want to add some vibration noise to help sell the effort involved. You could have a layer that has vibration noise throughout and then use layer weighting to have it vary in intensity. I usually don't bake down noise layers until the final polishing passes and usually not until I need to see exactly what my curves are doing.
For characters there are more considerations to make. Some very smart folks at MIT wrote a research paper about video magnification. They created an algorithm that could somehow amplify the apparent motion in a video. A video of a stationary crane, when run through this, swings wildly about because the crane is being buffeted by the wind. They filmed and amplified people sitting, not doing anything, but the output video shows then bring jostled around by their very heart beat. There's a rhythm to it and a logic that is absent from other noise. I've been meaning for the longest time to make this as an animation layer, but I find that every time I need it at work I don't actually have the time to do it. This is all subtle stuff but can really add to the realism of your character.
It is important to keep in mind that that the body is a unit, nothing happens in isolation, and so it's important to link noise from connecting body parts. They may not be one to one, but the noise in the chest, for instance, should feel like it affects the limbs and head. Similarly if you break up the arm, you can really sell it by having it affect the motion of the wrist.
Noise doesn't need to be limited to characters or objects; camera noise can also help add to the realism of a shot. It's good to think about how the camera is operated in a shot and adding in noise over the top that makes sense for that. Similarly you can add vibration noise for impacts and the like to really sell your animation. I do find that less is more with cameras, so keep it subtle and make sure it doesn't grab attention. People shouldn't be thinking about the camera.
I have a script I use for general noise that can be found here. You set value range for the noise, hit apply and get some nice random noise. Pressing the button again will get a slightly different result. For vibration noise, I bake a curve in a layer, select every other key and set a positive value. Then invert the selection and apply a negative value. I usually then run the previously mentioned noise script so the vibration doesn't feel too artificial, with low values so it doesn't undo the vibration feel.
It is important to reiterate that you should try to support
this, as with anything, with copious amounts of reference. Study the
natural world to get the best results.
Reality is full of imperfections and it's important that
our animation reflects that; especially when we're trying to fool people
with our computer generated unreality. Thoughtful and deliberate dirt,
noise and breakup will go a long way towards filling the gap between
your animation and convincing, natural motion.
Keep on keyframing!
Wednesday, September 5, 2018
Watch Where You're Looking!
There are a lot of contributing factors when it comes to eye direction and so it's a tricky thing to nail down. It's not as easy as just placing the eye aim control on an object and calling it done. In my experience the only thing the eye aim is good for is making sure the eyes aren't locked to the head; it is almost guaranteed that your character won't be looking at that control directly. Getting it the rest of the way and making it really appear as though your character is looking at a point in space is a bit more involved. Let's go through some of the things I do to try and nail eye line.
First things first is placing the aim control on the object the character is focusing on. I like having that visual representation of what the character is looking at, so I do my next broad offsets using the individual eye controls. I'll drop a camera on the object in question and offset the eye rotations so they look like they're looking directly at the camera. With this we at least know we have a solid technical base; the character is definitely, technically looking at the object. This is not usually where things stop.
Another thing I do to help with this stage of things is constrain cameras to the character's eyes so you can technically see what they're seeing. This is more interesting than it is helpful. I'll also constrain long, thin cones to the eyes to try and get a feel for what the eyes are looking like from the camera view. The theme you may be noticing at this point is that the technical considerations rarely get you to good eye lines. There are just so many things influencing the perception of eye line that a straight technical approach will not work.
The next thing then is to look at the eyes as a graphic shape, looking at them like a 2d animator. I'll often use my flat shading trick from a previous post to help in this regard. The important things to look for are the amount of white around the iris to the left and right ( top and bottom only really if the eyes are wide open) and the apparent angle of the eye in relation to the head. The eyelids themselves can do a lot to change the perception of that angle.
Don't be afraid to adjust head angle to help your eyeline. I had a shot where the apparent eyeline was too high. In the end, I barely touched the eyes and most of the adjustment came from head angle. You will have situations where that's not possible, like a snooty person looking down their nose, but most of the time there can be some leeway in head angle.
Watch out for cross eyed characters; eyes are never parallel to each other rotationally, they are usually out from each other a bit. You don't want to go too far the opposite direction, but depending on the character this can affect the appeal (think Hei Hei in Moana).
It's important to have a good eyelid setup as this affects apparent eye line as well; as the eye moves around in the socket it pulls at the lids and displaces the flesh around it. The corneal bulge of the eye also deforms the eyelid and should be a part of the setup as any change in the eye area can also, obviously, change the appearance of the eye.
Make sure as you are posing extreme eye positions that you're not digging the eyes in so far that the pupils can't actually see their target. Nudging the eye out, or changing the shape of the eyelid can help in this regard. Similarly with the eyelids keep your pupil clear unless you are deliberately going for a sleepy character.
The shading of the eye also makes a difference; I have often found the eyeline changing ever so slightly once a character is rendered. Having shaders with specular set up in your Maya scene helps give a character that needed spark of life, but refraction also makes a difference. Either you need a clever rigger to make an eye refract deformer (I think there's one in an old Maya book, Maya Hyper-realistic Creature Creation I believe) or else try and get your shot rendered as early as possible.
Get your character's brows involved; subtle adjustments can help support your eye direction. Nothing moves in isolation and the eyes are no exception. As the lids move and deform so too will they affect the brows. This will probably be subtle, but it will reinforce what your eyes are doing and give you that fine detail that sells the performance as real.
Most importantly get other people to look at it, even non-animators; especially non-animators. Granted, people can and will have different opinions about where someone is looking, but it's useful to get those opinions to fine tune and close in on good eye direction. And as always, flip, flop and invert your animation to get your eyes fresh. A mirror of your animation should still be looking at its intended target.
Eye line is a surprisingly tricky and subjective thing. Getting in the ballpark is easy, but that's not usually enough to get that solid connection. Hopefully these tips can help you knock it out of the park
Keep on keyframing!
Tuesday, July 31, 2018
Refer to Reality
I've been asked a few times how I go about using reference. To my mind there are two kinds of reference: personal and sourced. Personal is the video an animator shoots for themselves, and sourced is video an animator will find on YouTube, BBC Motion Gallery, etc. The following thoughts apply to both and I will point out instances where they are different.
It's important to note that the finished, rendered product is what people will see, not any of the steps along the way. So reference, in my mind, should be a help and a guide, not something to be copied. Rotoscoping never looks very good.
Whenever I begin any shot, whether at work or at home, the first thing I do is thumbnail. I get down my raw, uninformed ideas in the form of simple posing. Then I film or try to find reference with these ideas in mind. The ideas might change once introduced to the light of reality and that's okay; the thumbnailing is just pre-planning.
In the process of looking at the various takes I've filmed, or the different video clips I've found, I may edit these different takes together to make a supercut. It's not so important to have a single continuous perfect video clip to use as reference; people are going to see your finished animation up on the screen, not your reference.
Once I have this supercut reference, I thumbnail again, but now it's informed by the video and it becomes about finding the key poses, amping them up and making them stronger, more readable and more entertaining. I'll draw key poses, breakdowns, and make notes about little details I've seen in the reference if I can't reflect it in the thumbnail.
It's at this point that I ignore the reference for a while; I have enough information to start blocking. I may glance at it when I start splining, but I won't really look at it again until polish to make sure I'm not missing out on anything, to clarify my notes from earlier, and to make sure I haven't departed from the reference in a detrimental way. The animation needs to stand on its own and work within itself, and I think the only way to truly do that is to give it room to breathe and become its own thing.
That being said, I thinks it's fine to go back to the reference if something isn't working. Maybe a weight shift isn't feeling right, or a blink is just wrong. The reference will show you what the reality of that movement is. If it isn't in your reference, shoot more or find more; you need good foundations for any animation you do.
Gather reference, rely on it, but don't let it hold you back from making your animation amazing.
Keep on keyframing!
Wednesday, June 27, 2018
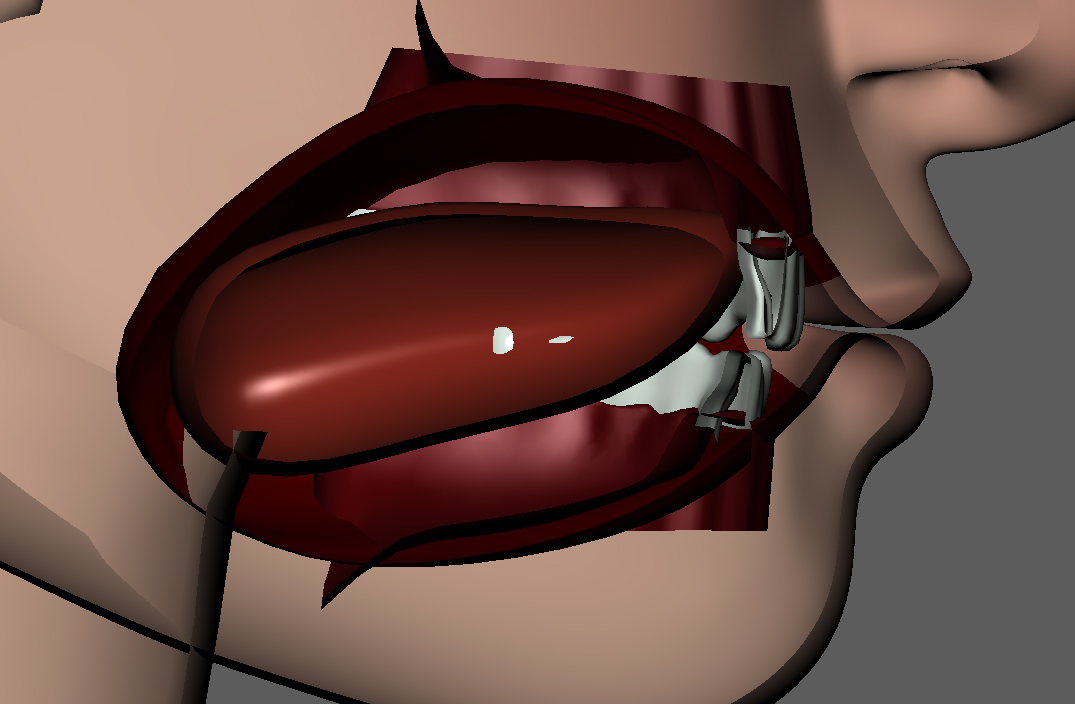
Give It Some Tongue
The tongue is an integral component to speech; directing air through the mouth to produce, in conjunction with lips and jaw, the various phonemes that make up vocal language. It is slightly surprising then that the consideration the average animator gives the tongue is limited to when the jaw is open enough to see it.
I am a firm believer of "if you don't see it, don't animate it." No one wants to waste time perfecting something that will never be seen. But! Consider a shot of a character where you don't see the legs, it would be important to still block in the legs, if they're walking or shifting weight. You'll never put the same amount of detail into those legs, but at least roughing them in helps the overall animation. I believe there are benefits to treating the tongue in the same fashion.
When an animator moves the tongue it is usually for one of two reasons. Either it's based on reference, or it's because the tongue needs to move when the mouth is open; movement for movement's sake. This is not a good position to be in (I've been guilty of this myself!), but like any animation, having a good foundation will go a long way toward believable movement. Knowing where the tongue has been and is going to be when not visible gives you a better idea as to where it should be and what it should be doing when the mouth is open. I think it's important to note, when I animate the tongue, it is a rough block, except for when it's visible.
When leading on Snoke I sent this video out to everyone on the team. It is a really good reference for how the tongue is actually moving and the range of motion it has.
The tongue also subtly affects the outward performance. The muscles of the tongue anchor to the jaw and so you do get movement under the jaw as the tongue moves around. This really only applies to the most realistic of characters, but it is a nice detail to add in.
In light of all this, I recommend a few things. First is to attach a camera to the side of your character's head, with the clipping plane adjusted so you have cut the head in half. Now you can see the tongue properly, much like in the X-ray video above. The second is to build up a pose library for your character's tongue. I pose the tongue with the full phoneme when I set up a pose library. Most pose library plug-ins should allow you to affect only the selected objects, so you can do a tongue pass after the fact, if you so choose. Ideally, if you're working professionally, your lead or supervisor would set this up.
Below I have illustrated the tongue position for various phonemes, separated out into vowels and consonants.
Vowels:


D/T as in "toy"

F/V as in "floor"

H as in "hot"

K/G as in "guild"

L as in "lord"

M as in "meld"

N as in "never"

P/B as in "PB and J"

R as in "roast"

Ss as in "snake"

TH as in "thing"

/TH as in "mother"

I am a firm believer of "if you don't see it, don't animate it." No one wants to waste time perfecting something that will never be seen. But! Consider a shot of a character where you don't see the legs, it would be important to still block in the legs, if they're walking or shifting weight. You'll never put the same amount of detail into those legs, but at least roughing them in helps the overall animation. I believe there are benefits to treating the tongue in the same fashion.
When an animator moves the tongue it is usually for one of two reasons. Either it's based on reference, or it's because the tongue needs to move when the mouth is open; movement for movement's sake. This is not a good position to be in (I've been guilty of this myself!), but like any animation, having a good foundation will go a long way toward believable movement. Knowing where the tongue has been and is going to be when not visible gives you a better idea as to where it should be and what it should be doing when the mouth is open. I think it's important to note, when I animate the tongue, it is a rough block, except for when it's visible.
When leading on Snoke I sent this video out to everyone on the team. It is a really good reference for how the tongue is actually moving and the range of motion it has.
The tongue also subtly affects the outward performance. The muscles of the tongue anchor to the jaw and so you do get movement under the jaw as the tongue moves around. This really only applies to the most realistic of characters, but it is a nice detail to add in.
In light of all this, I recommend a few things. First is to attach a camera to the side of your character's head, with the clipping plane adjusted so you have cut the head in half. Now you can see the tongue properly, much like in the X-ray video above. The second is to build up a pose library for your character's tongue. I pose the tongue with the full phoneme when I set up a pose library. Most pose library plug-ins should allow you to affect only the selected objects, so you can do a tongue pass after the fact, if you so choose. Ideally, if you're working professionally, your lead or supervisor would set this up.
Below I have illustrated the tongue position for various phonemes, separated out into vowels and consonants.
Vowels:
AA as in "apple"


AY as in "rain"

AH as in "hard"

EE as in "eel"

EH as in "net"

IE as in "slime"

IH as in "bit"

OH as in "over"

OO as in "spoon"

UH as in "cut"

Consonants:
CH/SH as in "child"

D/T as in "toy"
F/V as in "floor"

H as in "hot"

K/G as in "guild"

L as in "lord"

M as in "meld"

N as in "never"

P/B as in "PB and J"

R as in "roast"

Ss as in "snake"

TH as in "thing"

/TH as in "mother"

Those are the main tongue positions in relation to their phonemes. There's two things to note. First, there is a difference between the two TH phonemes and I think it's an important distinction. The first TH phoneme has the tongue between the teeth and it is a very deliberate TH, the second one is less open and has the tongue pressed against the back of the teeth which is more of an incidental, passing TH. The second thing to note is the N phoneme. I have considered adding in an NG, as they look relatively the same on the outside, but the tongue is doing very different things. For the N, the tongue is pressed similary to the D or T, with NG the tip comes down and the back comes up almost like a K sound. The reason I haven't included it so far is that you have a combination of sounds, the N, and then the K/G, and you could almost blend the two, and have the tongue move through the two positions. I may revise this at a later date after trying things out in some actual shots.
A general rule of thumb for movement in all of these is that vowels are fairly fluid, and consonants are generally a sharper motion away from the pose. Just look at the X-ray footage above and you'll see that all in all, much like the lips/jaws hit or skip phonemes on the way from one to the other, so too does the tongue.
At the very least now you can know why the tongue is moving rather than just moving it for movement's sake. Keep on keyframing!
Thursday, May 31, 2018
Practical Scripting for the Animator
When I started using Maya, scripting in MEL was very much beyond me. I was an artist, harnessing technology as a tool but keeping a professional distance. At a point it became a secret source of pride. But as I kept on animating I realised that I was wasting a lot of time doing repetitive actions; in this case I was setting up locators to create custom spaces.
One day I decided that I'd had enough, and I started combing the internet for how to start writing a MEL script. Stumbling through writing a script for the first time was not easy, and I'm hoping that I can give some pointers to help you out. Don't waste time doing the same thing again and again and again. That's madness. Learn just a little bit of scripting and you can really streamline your workflow and focus on the thing we all love doing: basket weaving. I mean animation.
The first thing is the easiest: set up manually in Maya and see what commands pop up in the script editor; everything you do in Maya is a command that is used behind the scenes. Using echo all commands under options, can give you even more detail about what's running under the hood. There is always a direct correlation with your actions in Maya and what pops up in the script editor. In my example, I would create a group and constrain it to the parent object.
As I do this the script editor spits out:

So as I do each manual step I can see that:

So as I do each manual step I can see that:
1. The command to make a group, or at least the one the Maya menu is using.
2. How to rename that group, the original name of the empty group was Null1.
3. How to select my parent (-r means replace) and -add the child with MEL before....
4. Creating a parent constraint between the two with a default weighting of 1.
Then I create a locator, and parent it under that group.

Constrain that locator to the child object and bake it out (so it keeps the original animation of the child object).
5. The command for creating a locator (the -p means position in this case, so it's at the origin)
6. Our familiar rename command
7. Select the parent second.
8. Parent the locator under the group.

9. The selecting and parent constraining we learned from above.
10. Selecting and baking the constraing. BakeResult has a lot of flags attached to it. Simulation should have been turned off because this isn't a dynamic simulation. The -t is time, so the numbers with the colon in the middle is the time range. The other one that is important to consider that I cropped out on accident is -sm, for smart bake, you can have that on to preserve your keys or bake out every frame or number of frames.
Then constrain the child object to that locator.


11. We constrain the child object to the locator like above.
And done! Except, it would only work for those specific names. It wouldn't work every time, so it'd be useless except in one very specific instance
Which leads me to the second thing, learning to store information -- in this case, the names of objects. Strings are the go to way to store object names. You can have a string to store a single name, or a string array to store multiple names. Floats and integers will store numbers for you, should you need certain values again.
So for example:
string $someText = "someText";
string $lastSelected[] = `ls -sl`; (You can then get your first object with $lastSelected[0])
int $wholeNumber = 10;
float $decimalNumber = 10.5;
There's also vectors, but I don't really use them myself.
string $someText = "someText";
string $lastSelected[] = `ls -sl`; (You can then get your first object with $lastSelected[0])
int $wholeNumber = 10;
float $decimalNumber = 10.5;
There's also vectors, but I don't really use them myself.
There were other things that were a bit more complicated to figure out. To be honest a lot of the time I just Google "Maya mel thing I want to know," and that usually gets the ball rolling in the right direction. Below are some of the resources I've come across that are very useful in figuring out how to do what I wanted:
- Maya MEL Commands - This is a list of all of the MEL commands, it has all of the relevant flags and examples of use. I use this most often!
- MEL Scripting - This gives a pretty good breakdown of common mel commands and gives examples as to how they work. Also covers making UIs in MEL.
- MEL How-To - Covers a lot of different questions and is a very good resource to see how things are broken down.
- CGTalk - Either someone has already answered whatever question you have or they are willing to if you post.
- HighEnd3D - Has many, many available MEL scripts to peruse for free.
I also did a lot of looking at similar scripts and breaking apart how they did things and googling the commands I didn't know. MEL is a language so there is a structure and a logic to it.
Most importantly, find someone who knows more than you. I don't know how many times I have banged my head against the wall, because one little thing wasn't right. Thankfully I had people I worked with who could tell me what I was doing won't, but even just asking in a forum like CGTalk should help you find the answers you need to make a script work.
Now, I know some if you have read this and are still daunted by this technical language. Don't be! Don't script for scripting sake, script so you have more animation time, meaning, script with an idea in place. You need to have a goal to work towards with this stuff. So constantly analyze what you do, what your workflow is and see if maybe there's a place to automate some of it. It'll save you so much time in the long run and you can focus on the animation itself.
I know there's also the fear of being pigeon-holed into a technical route if you reveal scripting knowledge. I know because I've been there, but really, in my experience, people are grateful, but not expectant. Also don't be afraid, if you feel you're being pushed in a certain direction, feel free to speak, your mental well being and desire for growth in certain areas should be a welcome discussion point with your boss. It should also be pointed out here that your job, as an animator, is to animate; script on your down time, or at home, or if you really need a tool, make sure the time writing is less than the time saved. Don't get tunnel vision and distract from your actual work.
Before I sign off, here's a list of things that I find supremely useful:
- Always end your lines with a semi-colon, it lets Maya know that command is finished. Likewise if you are using a command within the context of something else (like defining a string) put tildes on either side.
- objExists - Checks to see if anything with that name exists in a scene.
objExists pSphere1;
- getAttr - Returns the current value of any attribute.
getAttr ( $object + ".visibility" ) ;
- setAttr - Sets the attribute to whatever value is given.
setAttr ( $object + ".visibility" ) 0 ;
- For/In Loop - This lets you do the same thing for multiple objects in an array. In my example above, apart from the first object, any other object I select I would want to generate locators and constraints. The for/in loop allows me to do the same action again and again for multiple objects.
for ($object in $objects){
parentConstraint $object $parentObject; }
- If/Else - Good for toggling type hotkeys. If this condition exists, do this; otherwise do this.
if(`objExits pSphere1`){
select pSphere1;
}else{
polySphere -name pSphere1; }
- Tokenize - You can break up the name of an object based on an alpha-numeric character. I use it to try and to get namespaces, more often than not. In the example below, you can see I'm using the first section that comes out of the tokenize (the [0] means it's the first) because that's usually the namespace.
string $object[] = `ls -sl`;
string $storageBuffer[];
tokenize $object[0] ":_" $storageBuffer;
string $nameSpace = $storageBuffer[0];
- whatIs can help you figure out the specifics of a command. Sometimes a command behaves strangely or inconsistently, you can use whatIs to find out what it actually is and if it's part of another command. For example, when you break connections on an attribute, CBDeleteConnection comes out. If you use this command, it didn't always work, because it's waiting for Maya to source the script it lives in on your hard drive. Using whatIs you can find exactly where it is and what commands it is actually using to break that connection.
For instance! In the first example I used doGroup to make an empty group, using whatIs I was able to find that mel script in my maya bin folder and find that it was using the MEL command group. You can use group -em to make an empty group
- Pretty well all commands come with flags to define what you want to do with them. For instance, if you look at keyTangent, the MEL command that deals with tangents, there's loads of flags. And a lot of them you can query too. For instance you can query the in and out angles of your tangents, if you're into that sort of thing:
keyTangent -query -inAngle -outAngle pSphere.translateX ;
And it should then return to you with two numbers. Usually you have "command -flags $object(s)ToActUpon".
I really hope this is encouraging and not scary. It's not imperative to learn scripting to animate, but it sure can make it easier.
Keep on keyframing!
Subscribe to:
Posts (Atom)